Subscribe
Add a server or import an existing subscription
Identify the information you have before choosing an import method. A subscription link usually represents a set of server entries that can be updated; an individual server's details include its protocol, address, port, and authentication fields. These are not interchangeable: do not put a subscription address in Host, or use an individual server password as a subscription link. If the information came from an existing service provider, read its field instructions and confirm that all details are present. Do not change the protocol or guess missing parameters.
Have a subscription link? Import it with Subscribe
Open Home in Shadowrocket and tap the add button in the upper-right corner to open Add Server. Choose Subscribe under Type, paste the complete existing subscription address into the URL field, add an optional label to identify it, and save. Check that no spaces, line breaks, or extra text were added to the beginning or end. Treat links containing access credentials as private information; do not post them in public forums.
After saving, return to Home, wait for the subscription to load, and check for server entries in the SERVER group. Seeing the subscription name does not mean the servers were retrieved successfully: confirm that selectable entries appear in the group. If it is empty, check the network and the full address, then retry using that subscription's update action. Adding the same link again usually will not fix a parsing or access issue and can make the list harder to manage.
Have details for one server? Fill in the fields for its Type
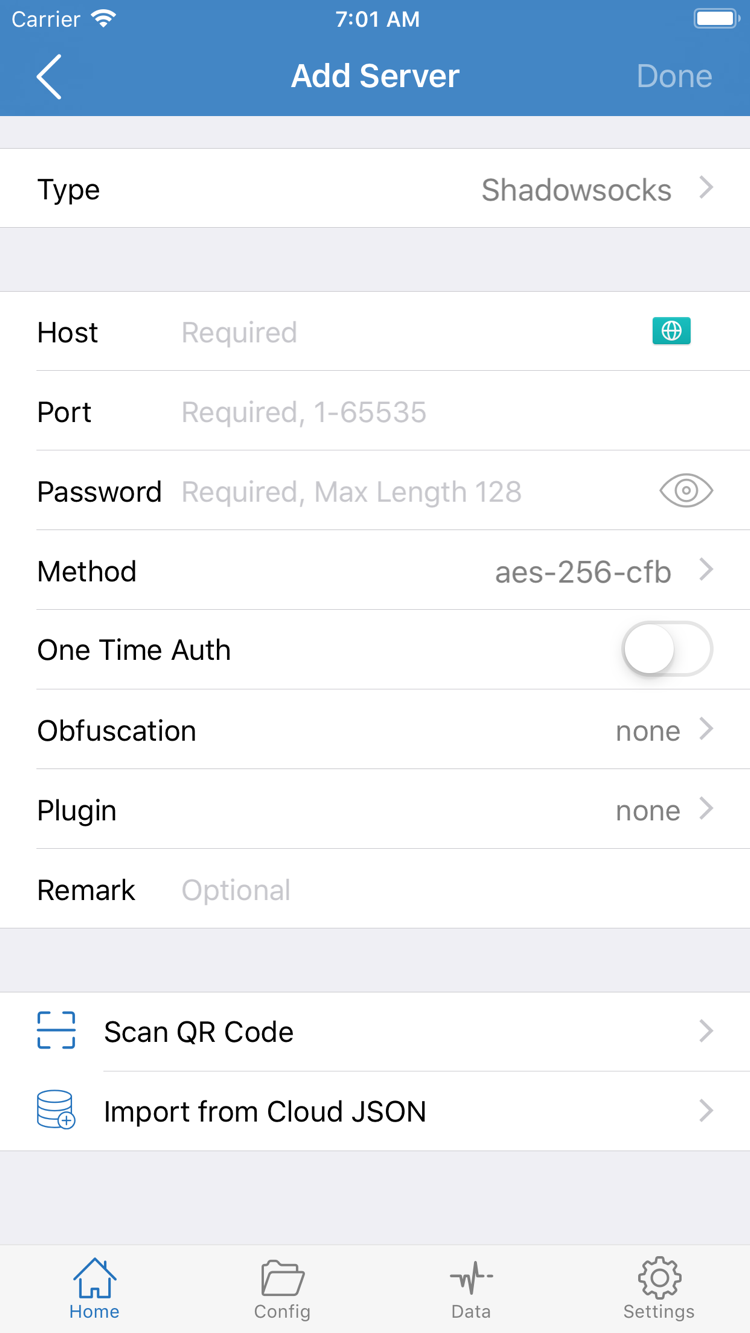
If you have details for one server, start with Add Server and select the correct Type. The screenshot on the right shows fields including Host, Port, Password, and Method. Fields vary by protocol, so use the requirements for the selected type and the information you already have. Enter the server's domain or IP in Host, the port in Port, and choose Method based on the supplied details, not just a similar-looking name. Check TLS and transport parameters one by one; do not use the screenshot as a substitute for your own information.
If you have a QR code, use Scan QR Code. Import from Cloud JSON works only with compatible existing data; it is not a general-purpose import option for arbitrary web links. After saving, return to SERVER, tap a server, and confirm that it is selected. This completes the import and selection, but does not establish a connection. Next, choose how connections should be routed.
Global Routing
Choose Config, Proxy, or Direct
Choosing a server and choosing a routing mode are separate steps: the server determines which entry is used for a proxy connection, while the routing mode determines which connections use the proxy route. Return to Home and tap Global Routing to see the current selection. For your first setup, avoid changing several settings at once. Decide whether you are testing the server or using existing rules, then choose the appropriate mode.
Config: apply rules from the active configuration
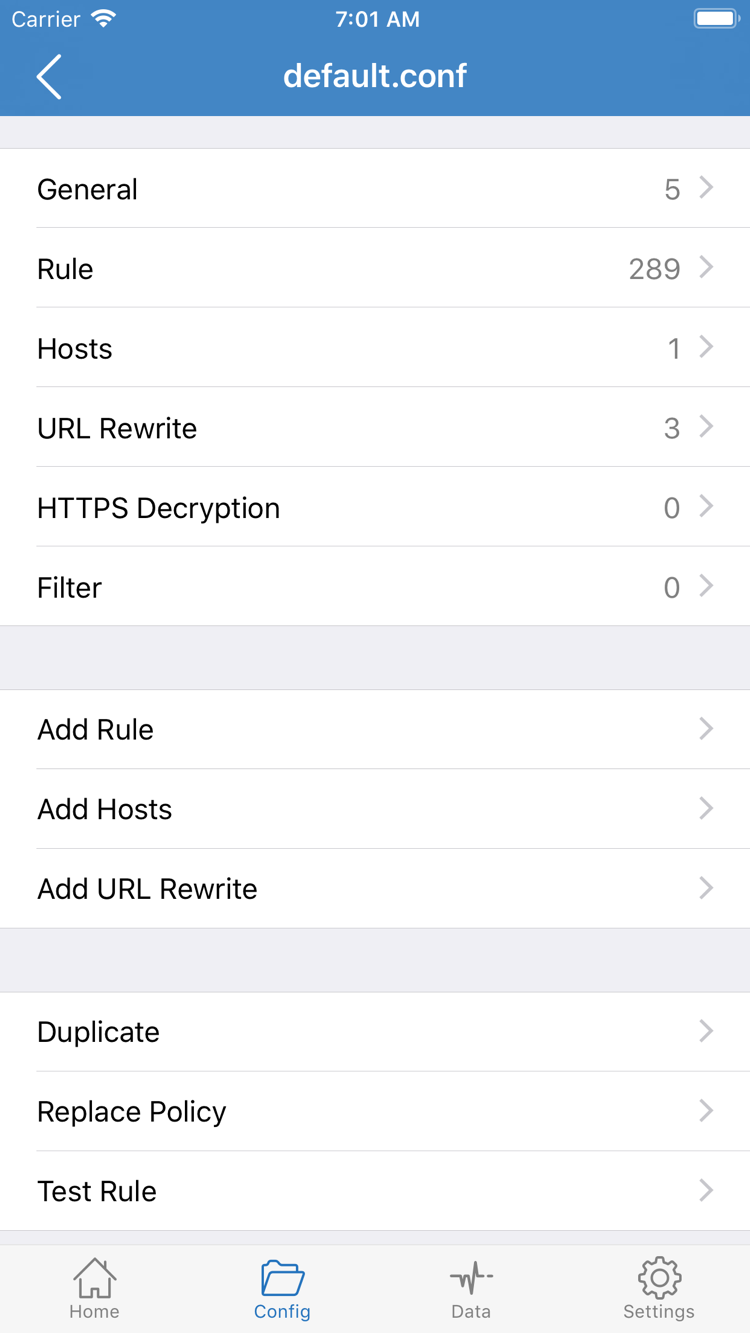
Config routes connections according to the rules in the active configuration. Before using it, open Config and confirm that the configuration you need is available and active. Open a configuration to view sections such as General, Rule, and Hosts. Make sure you know the source and purpose of an existing configuration. You do not need to enable URL Rewrite or HTTPS Decryption for a first connection.
Rules are generally matched in order; the matched rule and its policy determine the route. For example, DOMAIN-SUFFIX can match a domain suffix, GEOIP matches by IP geolocation, and FINAL acts as a fallback. If a webpage connects directly in Config mode, that does not necessarily mean the connection failed; it may be the expected result of a rule. Do not rush to tap Add Rule just to run a first test. Keep the existing configuration, identify what is happening, and then decide whether it needs to change.
Proxy and Direct: compare the results
Proxy sends connections handled by the app through the selected proxy route, making it useful for a short test of server availability. If a destination works in Proxy but fails in Config, check the active configuration and its rules before re-entering all the server details. After comparing the results, switch back to the mode you need so a temporary troubleshooting choice does not become your everyday setup.
Direct routes connections handled by the app directly, which can help you compare results with the proxy route. Selecting a server does not override the Direct selection. This comparison describes how the app handles its connections; it does not describe every type of system traffic on the device. For more about rule order, policies, and the three modes, see the proxy mode guide. Note your Global Routing selection before moving on to the connection steps; you will need it during verification.
Home
Turn on the switch and authorize the first connection
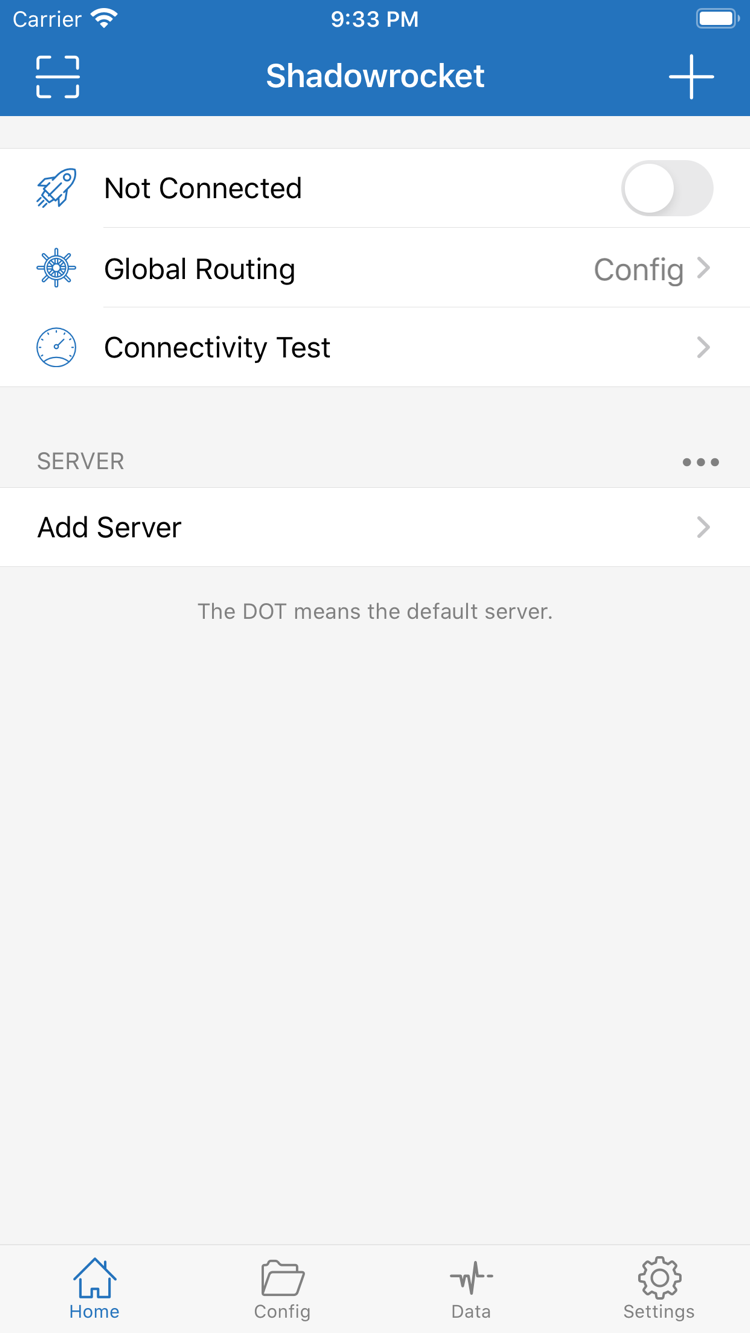
Return to Home and check the setup without changing any parameters: the server selected in SERVER should be the one you just confirmed, and Global Routing should be set to the mode you want to test. If you chose Config, confirm the corresponding configuration as well. When the top of the screen shows Not Connected, no app connection has been established. A test result next to a server name does not by itself mean you are connected; test results and the connection status serve different purposes.
Turn on the connection switch at the top of Home. The first time you connect, the system will ask permission for Shadowrocket to add a VPN configuration. Check the app name in the prompt, continue, and complete any required passcode or biometric verification. This authorizes the system to create a network connection configuration; it does not import another subscription, and you do not need to enter a server password in the system prompt. If you cancel, return to the app and turn on the connection again to complete authorization.
After authorizing, return to Shadowrocket and wait for the top status to change from disconnected to connected. Do not repeatedly toggle the switch while the status is changing, or it will be difficult to tell which action produced the result. If the switch turns off immediately or stays in a connecting state, first check for an unfinished system prompt, then check whether another VPN connection is active on the device. Disconnect the other connection before retrying this step.
After connecting, you can check the system VPN status to confirm that a tunnel was established. Its location may vary across devices and system layouts, and the same status bar icon is not always displayed. A connected status confirms only that the network tunnel is established; it does not confirm that the subscription is valid, the remote server is working, or DNS and rules are all correct. Continue with an actual access test rather than treating the open switch as the end of the setup.
During the first test, keep the network, server, and routing mode unchanged, and leave On Demand as it is. To stop testing, return to Home, turn off the top switch, and wait for the status to update before comparing with a direct connection. Consider automatic connection conditions afterward; this avoids having an automatic reconnection interfere with your results after you disconnect manually.
Connectivity Test
Verify in three stages: test, access, and rules
Once connected, use Connectivity Test on Home to check the selected server. This can help rule out an entry that clearly does not respond, but results depend on the test method and destination. A successful result does not mean every webpage will open, and does not directly indicate download speed, video performance, or UDP availability. Note the result for the selected server; there is no need to run repeated tests just to change the numbers.
Check the result with an actual visit
Open a browser and visit an HTTPS page you know and can check on your current network. Refresh it and try another page on the same site so you are not relying on cached content. Then test a different site to tell whether the issue affects one destination or access in general. If existing rules are expected to route a particular destination through the proxy, test that destination. Opening a page that would normally connect directly cannot confirm that the proxy route is working.
If a test fails, note what happened: a DNS error, a connection timeout, a certificate warning, or a page that loads but has specific content missing. Each points to a different troubleshooting path. Do not bypass certificate warnings just to load a page, or immediately change system DNS, the server protocol, and all rules. Keeping the original settings makes useful comparisons possible.
Check the connection log to confirm the route
To check routing, review the connection log or a related view under Data for the domain you just requested, the matched rule, and the handling policy. Use the information shown in the current interface. In Config mode, interpret DIRECT, PROXY, or REJECT together with the rule: REJECT may mean the configuration intentionally blocked the request, not that the server is unreachable. If the intended rule did not match, check the domain and rule order.
Finally, make a controlled comparison: change only Global Routing or switch to one other existing server, then make the same request again. If Proxy works but Config does not, check Config first. If two servers behave differently, check the server details and remote status. If the same page still fails with the connection off, consider the local network or the destination itself. If browsing works but calls or games do not, check UDP support separately; an HTTPS result does not apply to every protocol.
Diagnostics
Check settings based on the failure; do not reinstall repeatedly
Troubleshoot from the first step that failed instead of immediately deleting the app. Keep the current configuration, note the network, server, Global Routing mode, and specific error, then change only one item at a time. This helps you tell whether the change worked and makes it easier to revert. Reinstalling repeatedly usually will not fix an expired subscription, incorrect fields, or a remote service issue, and it may remove local notes and settings.
Import fails or SERVER has no entries
Check that the subscription is complete, accessible on your current network, and returns a format the app can recognize rather than a login page or error message. Do not paste a link containing credentials into an unfamiliar testing page. If you need to retrieve information from an existing service provider again, confirm it through the original channel. For a manually entered server, check Type, Host, Port, and authentication details one by one. Watch for capitalization, spaces at either end, and accidentally pasted quotation marks.
Tests fail or the connection status keeps changing
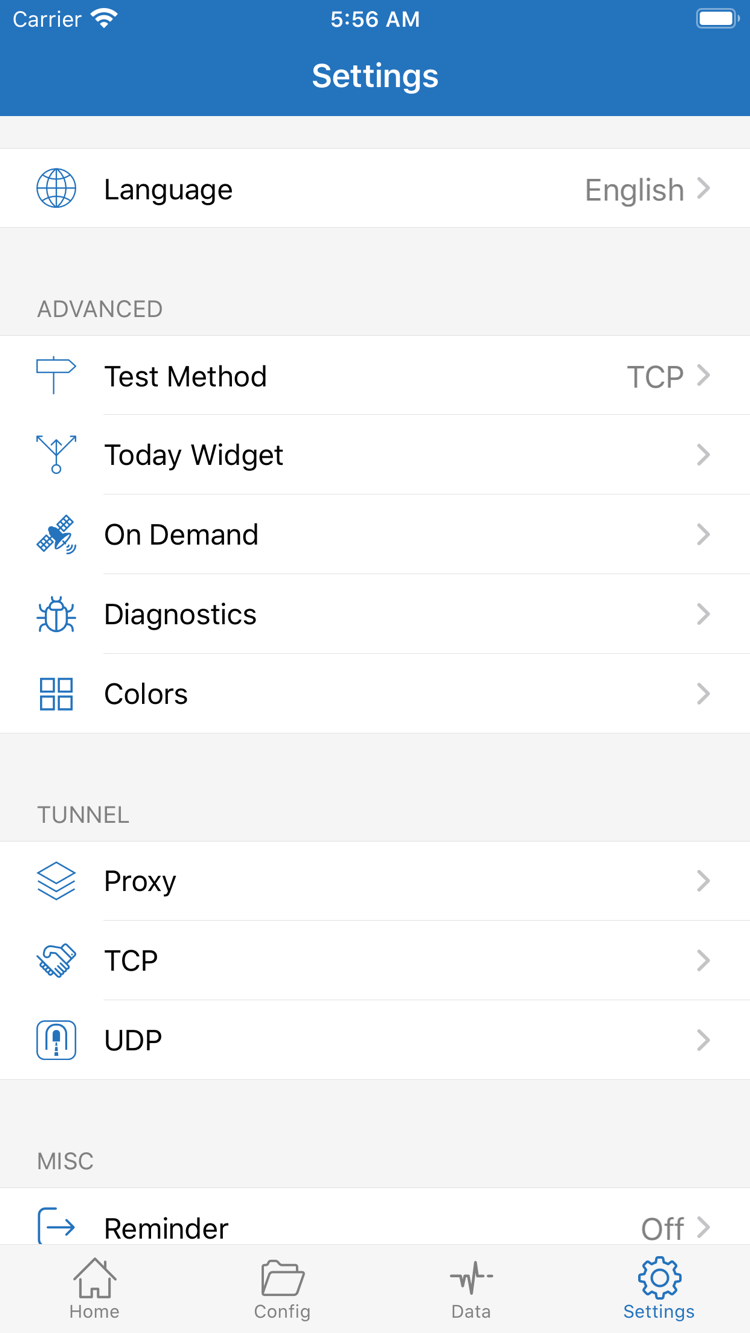
Open Settings and check Test Method to confirm the current test method. Results from different methods cannot be compared as though they were the same metric. If the connection cannot be established, first confirm that system VPN authorization is complete, then check whether the network requires a web login. Compare Wi-Fi and cellular data if possible, but remember that switching networks may trigger an On Demand condition. Check the connection status at the top as well.
The test responds, but webpages still do not open
Use the previous section to test Proxy and Config separately, then consider DNS or rules. Do not treat one DNS address as the answer for every situation; DNS resolution depends on the network and configuration. You do not need to change every option under Proxy, TCP, and UDP in Settings. These affect different layers, so adjust them only when the evidence points to the relevant setting. For more on DNS resolution and timeouts, see Troubleshooting.
Use Diagnostics to organize your findings
For further diagnosis, open Diagnostics in Settings and review information related to the same failed request. Before sharing, hide subscription URLs, access credentials, server authentication details, and other personal data; keep the error type, sequence of events, and relevant settings. If a change does not help, restore the original value before testing another item. These controlled comparisons are more useful than a full-screen screenshot containing many private fields.
This completes the first-time setup. App Store availability, purchase verification, and restoring your setup on a new device do not need to be handled in connection settings; see the genuine app guide. For a systematic explanation of rules, see the proxy mode guide. Keeping app access, importing, and connection issues separate makes it easier to return to the relevant step when something goes wrong, instead of repeating the entire setup.